Volutions - ID | News | Gadget | Tutorial | Freeware | Template | Etc.: backup
Showing posts with label backup. Show all posts

Tool To Backup / Restore Gmail Emails In Linux: `Backup Gmail` [IMAP]

Backup Gmail

A while back we wrote about backing up a Gmail account using Thunderbird. That doesn't work for restoring but you could at least have access to all your old emails.


'Backup Gmail' can backup / restore Gmail emails using a GUI or via command line

But I've recently discovered a small application that allows you to both backup and restore your Gmail emails in Linux with just a few clicks. The application is called "Backup Gmail" and you can use it to backup Gmail either from the command line or using a graphical user interface. It uses IMAP, meaning that restoring your emails will also restore their labels!


Incremental backups, preserve read / unread emails


Besides backup/restore, the also has a few other very useful features: it supports incremental backups and it can also preserve read/unread emails state - for this make sure you check the "Keep read/unread" option or else all your emails will be marked as read! However, using the "Keep read/unread" option, the Gmail backup becomes kind of slow.


Backup timetable, include / exclude labels


Further more, "Backup Gmail" can fetch only emails from a certain period of time and you can also include or exclude labels.

I've made two 'Backup Gmail' tests: one with a new account (which you'll see in the video below) in which everything worked perfectly and another one with a an account that has a few hundred emails. For this second account, Gmail Backup displayed an error when restoring my emails, however the restore actually worked; also, while backing up, the Backup Gmail window appeared to freeze but it was working so if that happens to you too, ignore it.

Not tested: the command line interface and the incremental backup option.


Backup Gmail video


Check out this video I've recorded demoing Backup Gmail (in the video you'll see both the backup and restore Gmail features in action):


Download and usage


Firstly, install the dependencies:
sudo apt-get install python-pyside.qtgui python-pyside.qtcore

To use 'Backup Gmail', download it from Launchpad (make sure you download the latest version), extract it and double click "gui.py", then select "Run". You can also set up automated backups using the command line interface - navigate to the folder where you've extracted Backup Gmail and run "./backup_gmail.py --help" to see all the available options. Basically all the features that are available for the GUI are also available in the command line interface.

Important: do not check the "Incremental Backup" option the first time you do a backup because you'll get an error like this: "username or password incorrect". You can check this option once you've performed the first backup.

Install Sparkleshare In Ubuntu Via PPA (Open Source Cloud Sync - Dropbox Alternative)

Sparkleshare is a tool to synchronize your files in the cloud - like Dropbox or SpiderOak - but unlike these, Sparkleshare is open source and allows you to use your own server. Sparkleshare uses GIT so if you delete/modify some files by accident, you can easily revert the changes. You can use it with your own server, GitHub or Gitorious. In this post I'll only cover setting up Sparkleshare with GitHub.

Sparkleshare is still in development and until now you had to compile it yourself but I've recently came across a PPA that provides Sparkleshare (Client) GIT snapshots so you can easily install it in Ubuntu 10.10 Maverick Meerkat.


Install Sparkleshare (Client) in Ubuntu via PPA


To add the PPA and install Sparkleshare in Ubuntu 10.10 Maverick Meerkat, use the commands below:
sudo add-apt-repository ppa:nuovodna/nuovodna-stuff
sudo apt-get update
sudo apt-get install sparkleshare

Warning: this PPA also provides some other packages so use it at your own risk! It is better to add the PPA if you plan on using Sparkleshare so you'll receive updates but if you just want to try it out, you can download the .deb below:


Setting up Sparkleshare with GitHub


Setting up Sparkleshare with your own server is a bit complicated so in this post I'll only cover synchronizing your files with GitHub. For using Sparkleshare with your own server, see: Set Up Sparkleshare With Your Own Server.

GitHub is a web-based hosting service for projects that use the Git revision control system but with Sparkleshare, we'll use it as our own cloud server to which the files will be synchronized. You can use Sparkleshare (w/ GitHub) to back up files in the cloud, easily share files with others, synchronize your local code with GitHub and so on. All this also applies to Gitorious too, but in this post I'll only cover setting up Sparkleshare with GitHub.


1. Get a GitHub account (it's free!).

2. Create a repository @ GitHub: click "Dashboard", then click "New Repository". Your repository name will later be referred to as your folder in Sparkleshare.


3. Start Sparkleshare, enter your name and email and click next. Then stop (do not go to the next step)! Now open Nautilus and go to /home/YOUR_USERNAME/.config/sparkleshare

Here, you'll find a file called "sparkleshare.YOUR_EMAIL.key.pub". Open this file in a text editor and copy its contents.

4. On the GitHub site go to Account Settings > SSH Public keys, click on "Add another public key":

Github SSH key

Here, give your key a title (like SparkleShare-home or whatever you want) and in the "key" field, paste the .pub file contents (which you've copied under step 3).

5. Now return to the Sparkleshare window:

Sparkleshare setup

Select "GitHub" and under "Folder name" enter: "your_github_username/repository" (without the quotes), where "your_github_username" is your GitHub username and "repository" is the name of the GitHub repository you've created under step 2.


Sparkleshare

Sparkeshare Ubuntu screenshot

Now you should have a notification area icon for Sparkleshare and a folder called "Sparkleshare/your_repository_name" in your home directory. Copy files to this folder and they will get synchronized with GitHub.

Important: do not place any private files into the Sparkleshare folder as these files can be seen by anyone if you have a free account. For a paid account, you can get more space, private repositories, private collaborators, etc.


For help setting up Sparkleshare with Gitorious, see the Sparkleshare documentation.

Update: for using Sparkleshare with your own server, see: Set Up Sparkleshare With Your Own Server

How To Backup Gmail Using Thunderbird

Gmail had some issues a few days ago and reseted some email accounts so many people now want to backup their Gmail account(s). I got this request by email so I though I'd suggest a very simple (and free) way to backup your Gmail account: using Thunderbird.

Using the exact instructions in this post, Thunderbird will not delete your Gmail emails and will not mark them as read so it acts exactly as a backup, without interfering with your actual emails. You can of course use this to send emails too (just like with any email client - I've used Thunderbird because it's easy to set up and cross-platform) but the purpose of this how-to is to use Thunderbird just to download your Gmail emails (so you can turn off the outgoing server if you want) so you have a local backup in case something goes wrong with your Gmail account.

If you want to backup your Gmail account online, you can use TrueSwitch to copy all your emails into your Hotmail account or use Backupify which is free for a regular (non custom domain) Gmail account.


How to backup your Gmail account using Thunderbird


1. To backup your Gmail account using Thunderbird you'll firstly need to enable POP in Gmail. To do this, go to Gmail settings and on the "Forwarding and POP/IMAP" tab, under "POP Download" select "Enable POP for all mail (even mail that's already been downloaded)" under "1. Status". 

Under "2. When messages are accessed with POP", select "keep Gmail's Copy in the inbox":

Gmail POP settings


2. Now you can start Thunderbird and add a new mail account (File > New > Mail account). On the first screen, enter a name, your Gmail address and Gmail password, then click "Continue":

Gmail Thunderbird


3. On the next screen, Thunderbird will automatically download the Gmail settings from its database. If you use Thunderbird 3.1.x, this is how it will look:

Thunderbird gmail settings

Here, you must select "POP" instead of "IMAP" for the incoming server. If you use an older Thunderbird version, you may need to click "Edit" and select enter the settings manually for the incoming server (POP) and enter the following info for the incoming server: pop.googlemail.com, port: 995

Now click "Create Account".


Gmail Thunderbird

That's it! Now simply click "Get mail" and let the Gmail backup begin. Thunderbird will download all your Gmail emails - this will take a while. Now whenever you want to update the "backup", simply open Thunderbird and let it do its job.

If you're behind a firewall / router that blocks the incoming POP port (955), you can install TOR and then use it as a SOCKS proxy in the Thunderbird settings.


Thanks to JC for the suggestion!

Install Linux in your Dropbox account using VirtualBox

DropboxDropbox is a very popular online storage service which provides 2GB of free space to store all your files, and selectively share them with the public. What is really nice about Dropbox is that it provides tools which integrates with Windows, Linux and Mac OSX and makes uploading and downloading files to and from your Dropbox, and act as a conduit for backing up all your important files - a seamless affair.
LinuxHaxor has a nice writeup on how to use your free 2GB Dropbox account to install your choice of Linux distribution via Sun's VirtualBox. Make sure the Linux distribution you choose is less than 2GB in size when installed as you will be limited by the 2GB space on Dropbox.

The writeup walks one through the installation of Damn Small Linux on Dropbox using VirtualBox. Read the article.

AptonCD - Create a backup of all the packages you have installed using apt-get

Consider this scenario... You are interested in installing GNU/Linux on your machine. Assuming you already have the latest version burned on to a CD, it is a simple affair of popping the CD into your CD drive and starting the instalation. But once the installation is done and finished, you will most certainly want to install additional software apart from the ones bundled with the CD. And if you are using a Debian based Linux distribution such as Ubuntu, you will be using the apt-get method. Over a period of time you would have installed a number of additional software including any packages satisfying their dependencies as well as upgraded some of the software to the most recent version.

The problem occurs when you decide to re-install Linux on your machine. You are forced to start all over again, downloading additional software using apt-get. Personally, I have re-installed Debian or a Debian based Linux distribution umpteen times on my machine. And each time I have wished there was a simple way of backing up the packages which I have previously downloaded and installed via apt-get.

A good samaritan has pointed out to a unique project named AptonCD which allows one to create a CD image (ISO) of all the packages downloaded via apt-get or even the packages in a given repository.

On Ubuntu for instance, you can install it using the command:
# sudo apt-get install aptoncd
Once it is installed, you will find a Gnome menu entry at the location System -> Administration -> AptonCD. Clicking on it opens a GUI which will aid in the creation of an ISO image of all the packages stored in the /var/cache/apt/archives directory and any other files which are needed. You can also run aptoncd from the command line to start the AptonCD program.

So how do you use the program ?

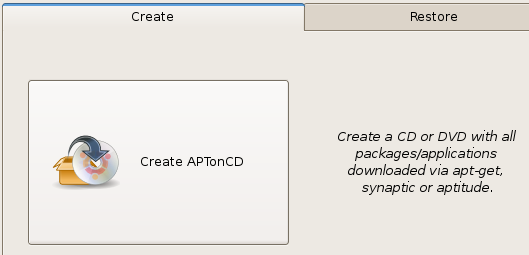
It is simple really, the GUI has two tabs namely Create and Restore. The Create tab has a single button which when clicked copies all the necessary packages from the /var/cache/ directory and displays it in a pop up dialog. Here you get to decide if you need to add any additional packages stored in an alternate location or remove some of the already selected packages. There is also an option to set the target media as a CD or DVD and the location where you want to save the resultant image.

Fig: The create tab has just a single button

Fig: Selectively include the packages using this dialog

Once the choices are made, the program creates the necessary CD/DVD image and saves it in the location you had chosen. Now you can either store it in a different location or burn it to a CD/DVD.

Fig: Restore tab allows you to restore from backup

The Restore tab of the AptonCD GUI contain three buttons each catering to a specific purpose. This tab allows you to -
  • Restore all packages available from an AptonCD media (read it as CD or DVD) on to the computer.
  • Restore packages from an AptonCD ISO image previously generated and stored locally.
  • Add a CD/DVD created as a repository for apt-get, aptitude or synaptic. Which means the program adds the necessary lines of code required in the /etc/apt/sources.list file which will enable you to use apt-get or any similar program to install the software on the CD.
I found this program really convenient to use not only when I re-install Ubuntu but also when I want to install the same set of programs on a different machine.

One thing it lacks is a way to automatically download the packages from a remote repository and create a CD/DVD image. But then this software is still in its beta stage and hopefully we can see more features built into it in coming years.

The AptonCD project is the brain child of Rafael who's first language (I believe) is Portuguese. Not surprisingly, I found the help files bundled with the project to require a bit more work as in the present form, they are just place holders for the required documentation. But he has done a remarkable job on the software itself and in its current form, it works flawlessly.
 
Support By Blogger